HPD Studio User Guide#
Abstract#
The NOVELDA UWB sensor demo kit enables the evaluation of NOVELDA´s UWB sensor products. The demo kit contains a radar module and a serial protocol interface module to connect the sensor to the computer. Sensor output can be visualized in NOVELDA HPD Studio for Windows/macOS and there is a command line option available for long-term logging and prototyping. The SW can run also run on Raspberry Pi.

Brief Step-by-Step Procedure#
This section briefly outlines the steps to set up and run the NOVELDA UWB sensor demo. More details are found in the sections below.
Run the NOVELDA HPD Studio Windows installer.
The installer will automatically install NOVELDA HPD Studio as well as the required drivers.
For other operating systems see more detailed sections further down.
Connect the FTDI USB dongle to a laptop with the provided USB cable.
Attach the sensor module to a suitable location.
For occupancy / light control the sensor must be placed in the ceiling or inside a ceiling-mounted light fixture.
For proximity applications, the sensor must be placed vertically on the wall or on the product the sensor is intended for.
Keep in mind that the radar antenna must point towards the detection zone.
Run the demo application by double-clicking the NOVELDA HPD Studio shortcut on the desktop.
Note
The USB contact on the FTDI dongle may be a bit tight. If the demo GUI reports no sensor connected, verify that the USB-C contact is plugged all the way into the contact.
NOVELDA HPD Studio - Installation Procedures#
Windows Installation procedure#
Run NOVELDA HPD studio installer.
The following window from Microsoft Defender SmartScreen will appear. To continue the installation, press “More info” and then “Run anyway”.


Follow the instructions from the installer. In the first window, the user can choose to install additional FTDI Drivers. This is necessary to run the demo. The FTDI installer window will appear after the installation of the NOVELDA HPD Studio application has been completed. If the user already has FTDI drivers on their computer, this box can be unchecked.
Read and accept the End-User License Agreement before going through a few additional steps.
Raspberry Pi Install and Run Novelda-CLI#
Download the installation folder from the NOVELDA webpage and extract it in any location on the Raspberry pi.
Open a terminal on the Raspberry Pi
Navigate to the folder location of the installation folder.
Download the novelda-cli-2.4.0-linux-armhf.deb application by running
sudo apt install ./novelda-cli-2.4.0-linux-armhf.deb. This will install novelda-cliRun
sudo novelda-cli -h. This will list all of the possible CLI options and the available algorithms. This is shown in the next image.
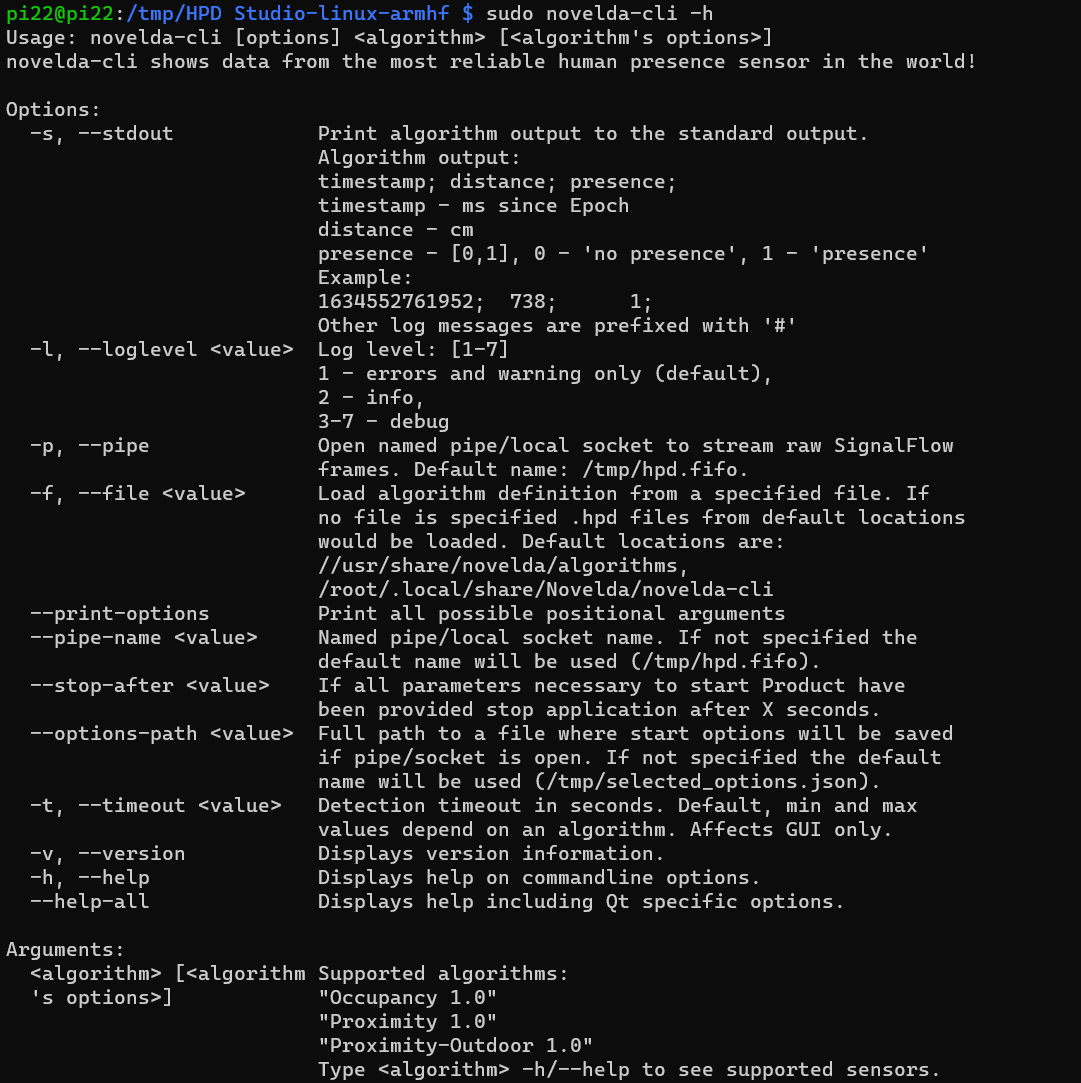
Note
To list all possible combinations of commands, use: sudo novelda-cli --print-options.
The suggested way to construct the command to run the novelda-cli will be to select the desired <algorithm> with the -h option, for example: sudo novelda-cli "Occupancy 1.0" -h.
This will have the next required command options for this algorithm prompted to you like the example below:

Finally, you will have a command like this:
sudo novelda-cli "Occupancy 1.0" X4F103 connection Native -s
The “-s” option print the algorithm output to the terminal. The output looks like this:
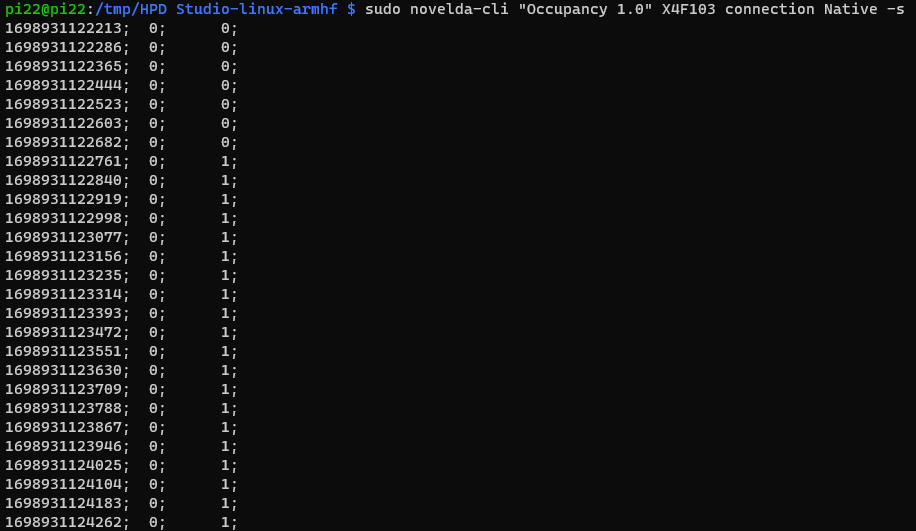
To support ‘Native’ connection please enable I2C in Menu -> Preferences -> Raspberry Pi Configuration -> Interfaces

Note
The application works on the 32 bits version of Raspberry Pi OS with desktop based on Debian 11 Bullseye
How to run the application#
The program communicates with the connected sensor through USB. When the program is launched, the user will have to select some settings to get started.
Select the product#
Choose the product to evaluate. The available algorithms and the version will be listed when the GUI is started. The demo currently supports algorithms for the following products:
Occupancy sensor - ceiling mounted, typically used for controlling luminaires.
Proximity sensor - vertically mounted, typically inside products such as appliances to control displays or similar.
Proximity-Outdoor sensor - For appliance interaction. Using a vertically mounted sensor. Tuned for rain rejection.
Select the connected sensor#
The user should select the correct sensor from the menu with available sensors.
Select range, sensitivity and timeout#
The user selects a maximum detection range from the drop-down menu. The maximum distance will vary based on which algorithm is being used.
Keep in mind that the sensor can see through most walls and that static objects can act as mirrors. It is a good idea to set the max range as short as possible to avoid false detections and allow a more free choice of sensitivity settings in the next step.
Sensitivity and timeout
- All the algorithms offer a selection of sensitivity settings (usually 1-5). These must be chosen carefully to balance the desired detection probability against the probability of false triggers from unwanted targets in the zone.The optimal setting depends on the environment of the sensor (the amount of clutter in the detection zone) and the application-specific consequences of missed detections and false triggers.How easy it is to trigger a detection will be affected by the chosen sensitivity.Key points to bear in mind are that a longer hold time allows the choice of a less sensitive setting, which in turn will reduce the number of false detections.
The timeout decides how long the sensor reports “DETECTION” after the last actual detection. The current signal processing algorithms rely on a certain hold time for robust operation. This hold time is user-configurable within a given range for each algorithm, but NOVELDA recommends using at least the following:
Occupancy: 60 seconds
Proximity: 15 seconds
- Start
When the correct settings are selected, press the “Start” button.
- Change Settings
It is possible to go back to change the settings at any time by pressing ESC or by using the arrow in the top left corner.
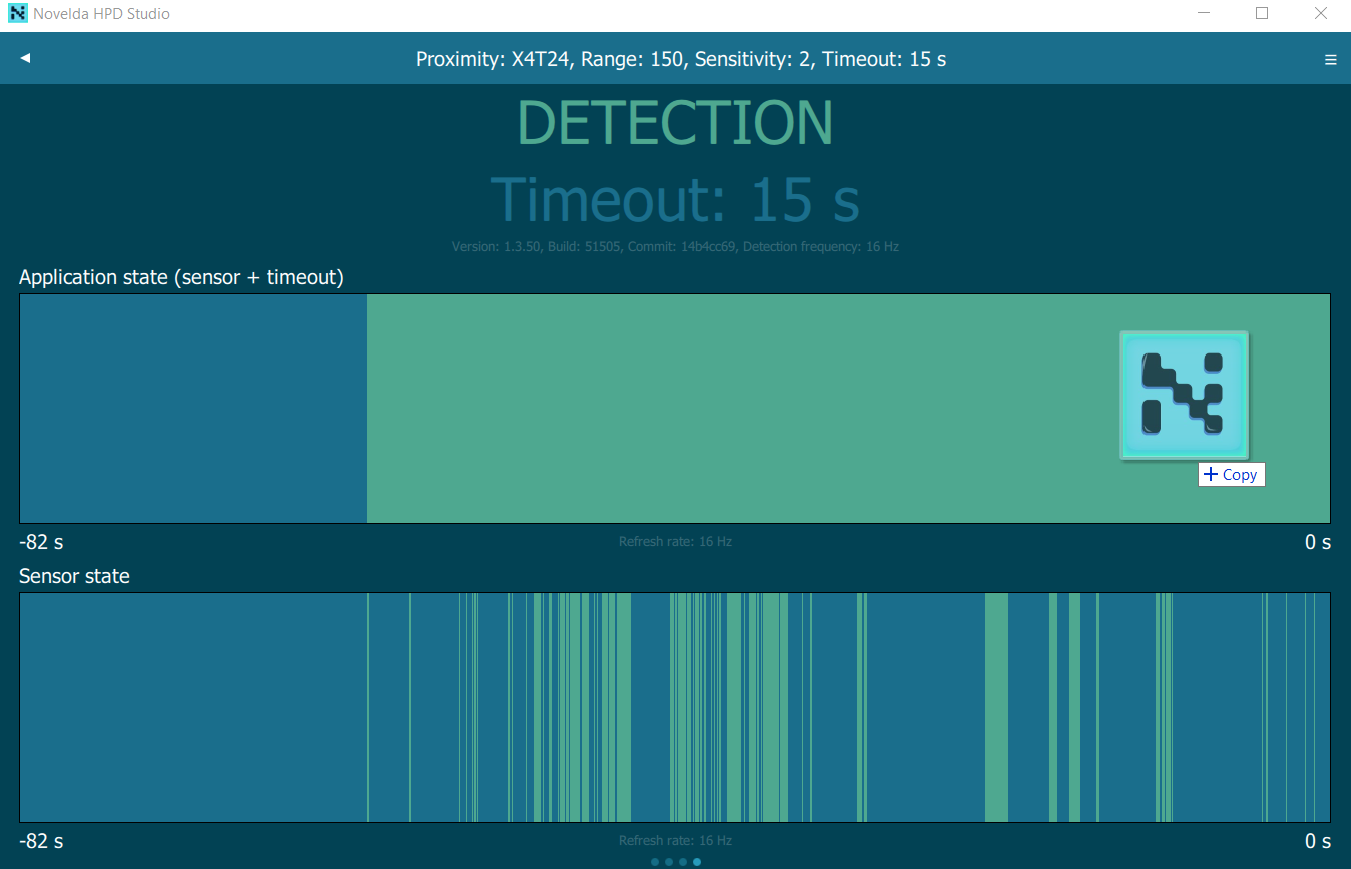
Application Output#
When the program starts, a new page will show the current state (detection/no detection), the timeout countdown and the selected settings at the top of the page. The output also includes a Sensor State plot and a Power vs. Range plot. The first plot shows the sensor state with the detections (+timeout) marked in green. In the Power vs. Range plot a bright green line displays the signal power at different ranges, and the darker, blue line shows the detection threshold. In this plot it is also possible to select “Show SmoothMax” and “Show distance information”. “Show SmoothMax” will apply the SmoothMax function to the output. The “Show distance information” option will show the distance to the closest detection in the plot.
Command Line Interface (CLI)#
To use the NOVELDA HPD Studio command line interface (CLI), navigate to the bin folder in the installation folder in a terminal. The NOVELDA HPD Studio also has a command line interface which will print the sensor data to the standard output in a semicolon-separated format. The format of the output is: timestamp; distance (currently not available); presence (0/1); The CLI includes the same options for range, sensitivity and timeout as in the GUI. To print all options for CLI run the “Novelda HPD Studio.exe” (“NoveldaHPDStudio-armhf.AppImage” for RPi) followed by -h or - -help in the command line.
& '.\Novelda HPD Stuido.exe' -h

The supported algorithms are listed at the bottom of the page when the help page is printed, as shown in the figure above.
To run with default settings, run the “Novelda HPD Studio.exe” followed by -s, -n, the wanted algorithm and the connected sensor & '.\Novelda HPD Studio.exe' -n -s "Algortihm Version" X4F103,
as shown in the next figure.

The settings can be adjusted by adding the timeout (-t), range and sensitivity manually. To print the options for range and sensitivity, the following format is used:
& '.\Novelda HPD Studio.exe' [algorithm] <module> [parameter] -h (Example: & .\Novelda HPD Studio.exe "Occupancy 1.0" X4F103 range -h).
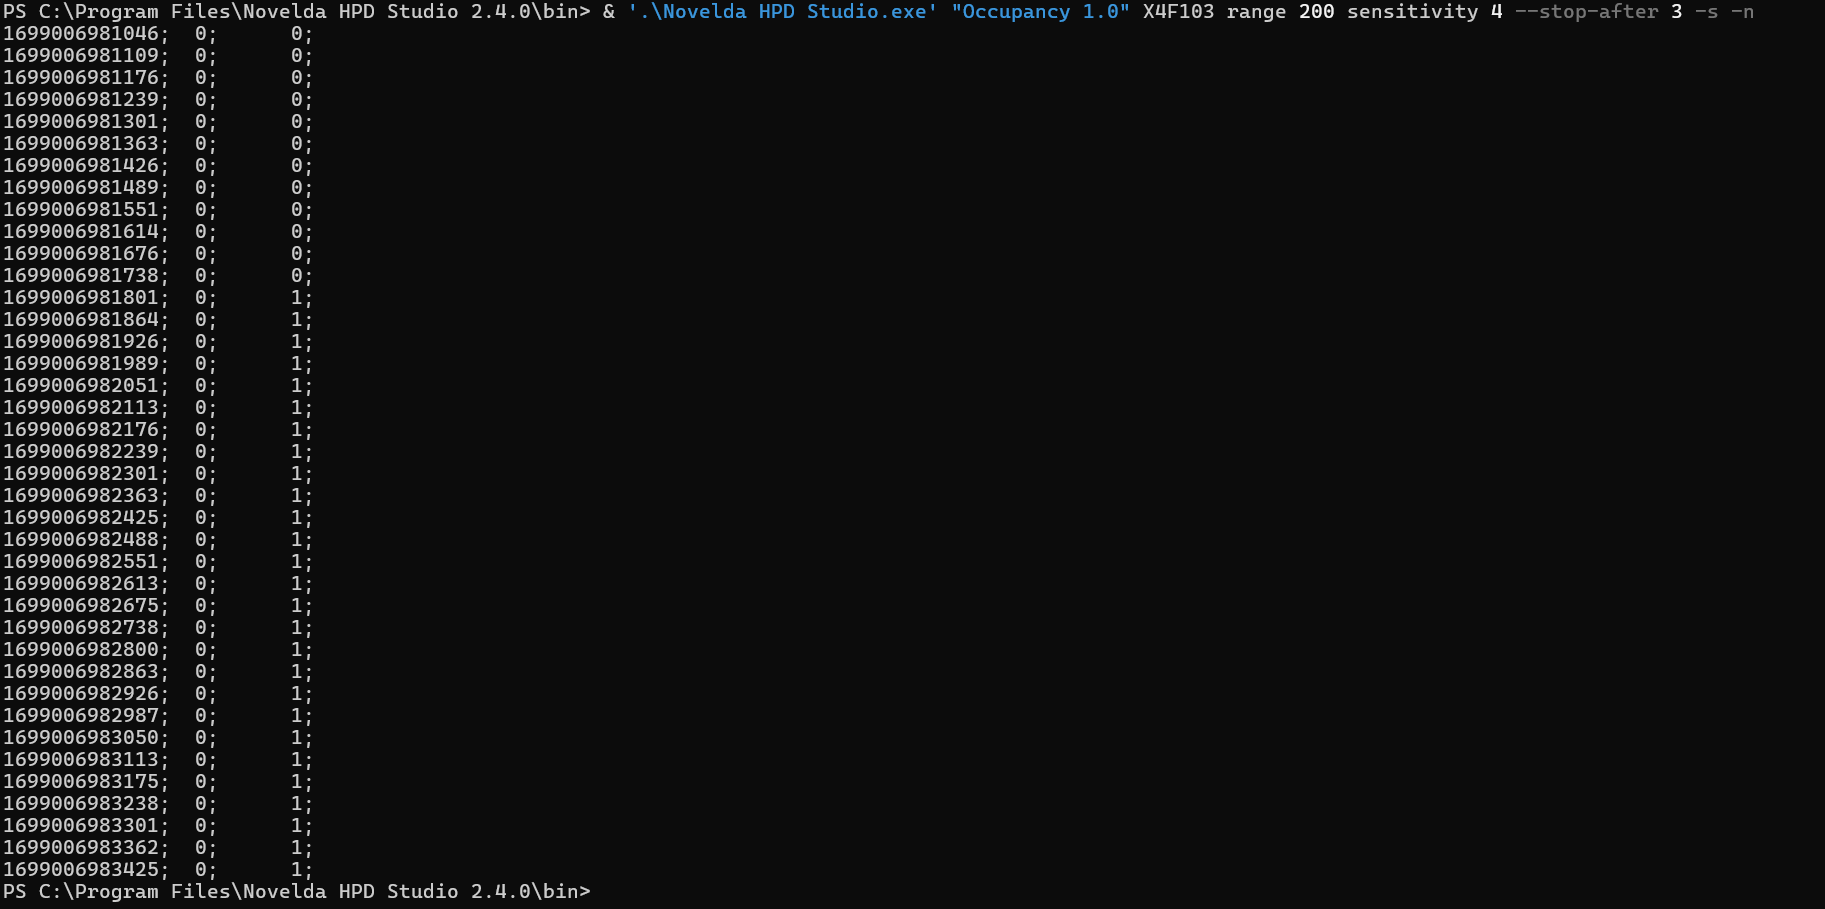
An example of how to run the program with other settings: & .\Novelda HPD Studio.exe "Occupancy 1.0" X4F103 range 200 sensitivity 4 -t 60. This output is shown in the next image.

The –print-options command helps list all the combinations of algorithms, sensors, sensitivity and range options available on HPDStudio like shown in the image below.
"Novelda HPD Studio.exe" --print-options

The –stop-after option provides the possibility to stop the console output after a desired duration in seconds.
"Novelda HPD Studio.exe" <"Algorithm"> X4F103 sensitivity <> range <> --stop-after <> -s -n
Adding new .hpd files#
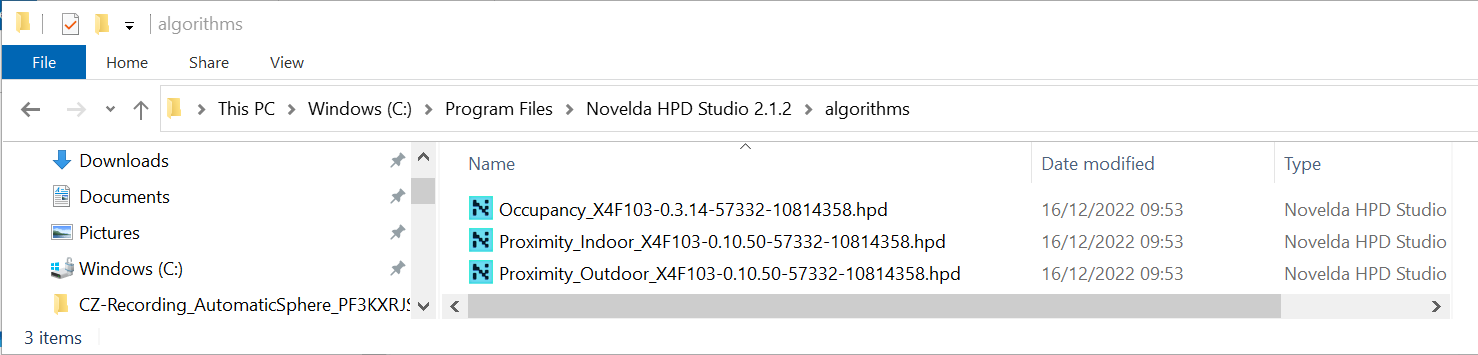
If a new version of the algorithm is available, users can easily add this to their existing NOVELDA HPD Studio application. The algorithm will be provided as a .hpd file which should be added to the algorithms folder, as shown in the next image.
NOVELDA HPD Studio also supports drag-and-drop of .hpd files. This means that the user can drag .hpd-files directly from the download folder and into the application, see the next picture. The new algorithm should appear immediately in NOVELDA HPD Studio, and in the algorithms folder.
If double-clicking a .hpd-file, NOVELDA HPD Studio will open with this specific algorithm. This will however not add the file to the correct folder, and the algorithm will not be there the next time the user opens HPD Studio in the normal way.
Customizable Python Demos#
NOVELDA HPD Studio supports streaming sensor data to a temporary buffer. This functionality can be used to write custom application logic on top of, or in place of,
the standard application logic in HPD studio (which is a simple timer).To use this functionality, the “Stream data over named pipe/FIFO” box can be checked under the settings
menu in the HPD Studio application. It can also be activated via the Command Line Interface with the following argument “-p” (it is still possible to select and change options
via the Graphical User Interface (GUI) if that is desired). In PowerShell, the full command looks like this, assuming you have navigated to the install/bin directory:
& '.\Novelda HPD Studio.exe' -p
If your application does not require visual output, you may want to specify the -n/--no-gui flag to start streaming data without having to select options via the GUI.
When using the -n flag, it is necessary to explicitly specify which algorithm you want to run, and which sensor you are using. All other options will use the default
value unless explicitly specified. Minimalistic example in PowerShell:
& '.\Novelda HPD Studio.exe' "Occupancy 1.0" X4F103 -n -p
For more details, please refer to the section titled “Command Line Interface (CLI)”.
Picking up streamed data in Python#
Once NOVELDA HPD Studio is running, and streaming data to a buffer, the data can be picked up by another program. NOVELDA provides a collection of python scripts for quickly getting started with reading this data. These scripts can be found in the zipped folder “NoveldaPythonDemo.zip” which is located on: X4 Demo Kit webpage
First time use#
Before first-time using the Python scripts, it’s important to install all dependencies. First and foremost, you will need to install Python 3 and add the location of this installation to your PATH environment variable.
Open a terminal window, like PowerShell, and navigate to the “NoveldaPythonDemo” folder.
Execute the following commands to install the required python packages:
python -m pip install novelda_serialization-0.1.1-py3-none-any.whl
python -m pip install -r requirements.txt
Note
It is recommended to use a python virtual environment when installing the python packages and running the examples.
Running Examples#
There are several examples of getting started with reading streamed data in Python. Run the command python NAME_OF_EXAMPLE to run the wanted example from the “NoveldaPythonDemo” folder.
The script called print_presence.py is the most minimalistic example. It shows how to read which settings NOVELDA HPD Studio is currently using, including where to find the data buffer, and how to attach a callback function to this data stream so that you can write your own application logic.
The callback function is called each time the result of a new radar frame is added to the buffer.
The script called state_change.py shows only changes in state (PRESENCE and NO PRESENCE).
The script called print_distance.py shows how more level data can be extracted for distance estimation. Distance estimation works better for Proximity product.
The script called show_distance.py demonstates how to make minimal application with GUI with PyQt5.
Troubleshooting#
When starting up the NOVELDA HPD Studio application, an error message like the one below can be displayed if there is something that doesn’t work as expected.

To troubleshoot this, please start the application from the command line using the -l7 parameter:
.\Novelda HPD Studio.exe "Algorithm" -l7
The printed output will show a more detailed error message that can be debugged in collaboration with NOVELDA.